
Chord changes are hard for many guitar players. But not anymore. Discover 10 ways to change chords faster and smoother.

It’s essential to be able to change between chords smoothly and quickly if you want to sound any good at playing the guitar.
The trouble is that fast switching between chords whilst strumming and picking is tricky for beginners.
Be honest. Are all of your chord changes 100% buzz-free, mute-free, and super quick?
No?
Don’t worry, my friend, you’re not alone.
It doesn’t matter if you’re a total beginner guitar player or have been playing for 15 years; your chord changes will likely need a little magic dust sprinkled on them.
Don’t fool yourself into thinking that no one can hear your mistakes while playing guitar. The key to sounding great on guitar is to play clear chord changes.
Carry on reading to learn the best techniques to improve your chord transitions for a cleaner, quicker, and more effortless performance.
Table of Contents
Step #1: Keep it Close

It’s simple. The less you move your fingers, the faster you change between chords.
The truth is, the weaker your fingers are, the further from the strings they’ll move when you change chords. You may not have noticed just how high they’re lifting off.
Try this: Change between 2 open chords, such as G major and E major. If your fingers lift more than 2cm from the strings, you need to work on keeping them closer.
Sure, this will take some getting used to. It’s all about building up muscle memory and strength, though. What feels impossible today will feel like a breeze after regular practice

Step #2: Are You Late for an Appointment?

Whoa there. It’s not a race! Slowing down is the number one tip I give to people I teach to play the guitar. Play your chord changes slowly.
Despite what some people think, you can only play fast if you learn to play slow. Playing chord changes slowly and perfectly requires skill and finger control.
So, the deal is that playing slowly builds up your muscle memory, finger strength and control.
Gradually build up the speed when you practice your guitar. Result? Your chord changes get lightening fast in less time.
Pro Tip
ALWAYS use a metronome when playing any chord change exercises (See step 6). Tight and consistent timing is the number one skill every guitar player should be working on. Every time you practice.
Step #3 Build it Up
Smoothly playing chords on the guitar is all about taking small steps and building muscle memory.
Don’t rush into plonking all your fingers down on a new chord shape all at once. ‘Cut’ the chord up.
Try placing your fingers on one string at a time if you find a new chord shape difficult. Play alternate picking ascending and descending all the strings.
Add on the next finger. Rinse, and repeat. Example: G major open shape: try getting the notes on the top E and B strings on fret three perfect first.
Next, place your 2nd and 1st fingers on the bottom E and A strings, respectively.
Step #4 Bottom First
At first, your fingers won’t hit all the strings simultaneously on a new chord. In fact, some chords feel so darn hard at first; it’s like you’ve got time to pour yourself a cup of tea between each finger touching base.
You know what I mean, don’t you? We’ve all been there.
Give this great trick a bash: Play the low bass string note of the chord first. The lowest pitched note is typically the root note. A root note is the note that identifies the key center of a chord.
On the main chord shapes guitar players first learn, the root note is found predominantly on the E, A, or D strings. (See the image below, which shows the root note on an open C major chord.)
This simple technique can help to increase the clarity of your chord changes tenfold. Thanks to the thicker strings, you’ll build up your finger strength best on an acoustic guitar rather than an electric guitar.
So, if you have an electric guitar and an acoustic guitar, opting for the acoustic when you play these drills is a good idea.
Step #5 Find a Common String
Some chords have notes played on the same string when changing between them. The E major to D major chord change is a prime example, as illustrated in the exercise below.
The first finger is the commonly shared finger between these two chord shapes.
Keep the shared finger pressed down on the string when you switch between the chords. It’s simple once you recognise what the shared string is. Try this method for yourself:
Exercise: Sliding Finger
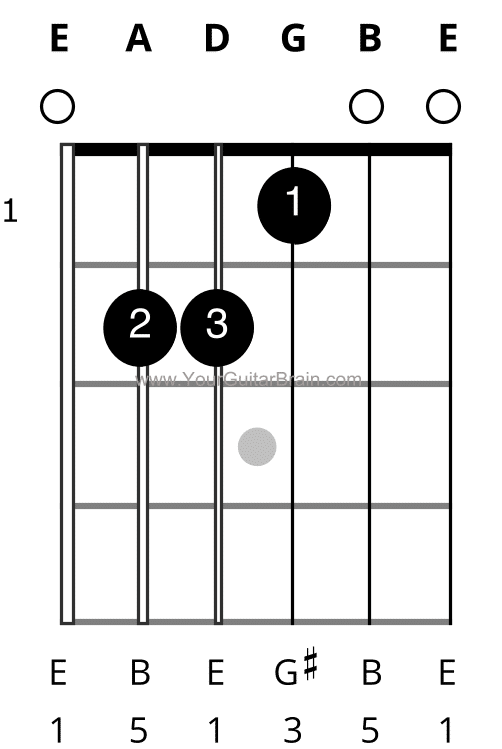
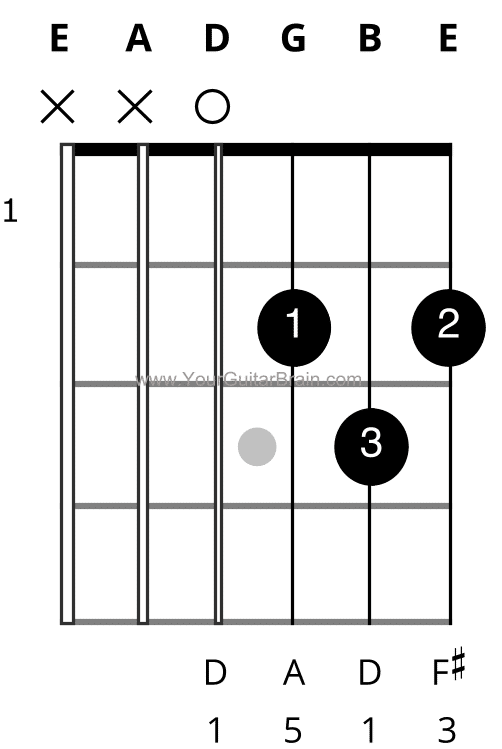
1. Place all of your fingers down on the open E major chord.
2. Strum the E chord once, then immediately change to the D major chord and strum that once.
3. Repeat the chord change 4 times:
E-strum-D-strum – E-strum-D-strum – E-strum-D-strum – E-strum-D-strum
4. On the 4th change, look at your 1st finger as you go from the E to D shape.
I bet it is lifting off the G (3rd) string, isn’t it?
If you answered yes, you don’t want to do that. It’s wasted, unnecessary movement.
The fix – Slide your 1st finger up and down the 3rd string, don’t lift it when you change between the E and D major. Do this in any song with this chord change you learn from today.
You’ll achieve “economy of movement”, which will make the chord change quicker, slicker, and cleaner.
Pro Tip
If you're a beginner guitarist, your fingers will be slow to form a chord shape. Don't stress out. The more you practice the ten steps outlined in this article, the faster your chord changes will improve.
Step #6 Are You Still Not Using This?

Get rid of messy chord changes with step 6: Use a metronome. This simple tool can help you keep a steady beat and ensure that your chord changes are smooth and accurate.
You can use a traditional wind-up metronome or a digital metronome. There’s no room for excuses here; the only thing holding you back from using a metronome to measure your tempo is, frankly, a lack of effort.
Don’t miss out on the benefits of using a metronome for your guitar practice. It’s the best way to track your progress and improve your timing.
A metronome will help you change chords faster and smoother, as long as you use it correctly. You’ll be amazed by how good your chord changes will sound in a short time.

Step #7 The Freeze Method
The Freeze Method is an excellent technique for achieving smooth and fast chord transitions by training your fingers to move in sync.
While it might not speed up your initial chord transitions, as a beginner, it’s common to place one finger down at a time when learning a new chord.
You’ll soon realise doing this can become a major speed bump in your progress. Your chord changes will truly take off when your fingers seamlessly hit the strings simultaneously.
You’re probably thinking, Okay, that makes sense, but how do I make my fingers go down at the same time?
Using the Freeze Method is the answer.
I’ll explain how you use the Freeze Method in the following exercises. Supercharge your gains by recording clips of yourself playing. Use your smartphone or tablet you use for reading sheet music.

Guitar Terms for Beginners A-Z
Because to play great guitar, you need to know more than just the notes; you need the words
Buy on Amazon ↑

Essential Guitar Chords for Beginners
Learn the most popular chord shapes used in 1000s of your favourite songs
Buy on Amazon ↑

Easy Peasy Guitar Music Theory
A must-read for guitarists who think they can skip theory and for those who know it's crucial
Buy on Amazon ↑
Let’s kick things off with the Freeze Method drill.
- Begin by positioning all your fingers on a chord you’re currently working on. Choose one that’s still a bit challenging for you. Keep that chord shape locked in.
- Now, here’s the crucial part – lift your fingers off the strings with extreme slowness. As you lift, focus on freezing your fingers in the exact shape of the chord.
Make sure not to raise them more than 1cm away from the fretboard initially.

- Place your fingers back onto the strings. Your aim is to refine your finger control so that all your fingers come into contact with the strings at the same precise moment.
- You might observe that one finger consistently beats the others to the strings. To iron out this issue, keep repeating the exercise. Lift your fingers off the chord and place them back down until they hit the strings simultaneously. When you feel your muscle memory kicking in, gradually increase the lift height of your fingers.
It’s too easy to focus on what you can’t do, instead of what you can do.
FAQ – How long shall I do the Freeze Method for, and how many times?
As long and as many times as you can is the answer. Here are some actionable steps to start with:
- Choose 3 chords you know need improving
- Stick one of your favourite albums on
- For the whole of the first song, practise the Freeze Method on chord one
- For the whole of the second song, practise the Freeze Method on chord two
- For the whole of the third song, practise the Freeze Method on chord three
If you feel like you can rise to the challenge, rinse and repeat the whole exercise multiple times. That’s about 25 mins of practicing like a guitar ninja.
Congratulations. You are one step closer to chord change domination.
Step #8 Looped Pair Strike

Introducing the Looped Pair Strike exercise, a close cousin of the Freeze Method we discussed earlier. The twist here? You’ll be practicing it with two chords instead of one.
Here’s the deal:
Select two chords that have been giving you a run for your money when played together.
Your mission is to forge a strong bond between these chords. Start by changing between this pair of chords at a leisurely pace. Simply play one down strum on each shape and repeat the sequence.
The aim is to build muscle memory and control. I’m not saying this is the most exciting and enjoyable exercise you’ll ever play.
However, like everything in life, if something good is worth getting, it requires some hard work and a bit of good old-fashioned grafting.
You have to be strong and have determination, focus, and dedication.
When you play the Looped Pair Strike, pick a slow, sensible tempo. You know the drill by now – use a metronome. Not only will you be working on your timing, but a metronome is a great tool to help you monitor your improvement.
You’ll be amazed at how much this one method alone works.
Exercise Bonus Points: The success of this exercise lies in repetition. But fear not, you’ve got no worry about being that annoying guitar player who won’t shut up in the room.
Why? All practice drills don’t need to be played loudly. See the Pro Tip below.
Pro Tip
Play the changes only using your fretting hand. Doing this gives the brain less information to process, so muscle memory builds faster. Add in the strumming hand when your fingers start to land on the chords with more accuracy.

Step #9 The Windscreen Wiper Method
In the realm of guitar playing, mastering what I call the Windscreen Wiper Method is a must. I’ll explain.
Imagine your strumming hand as the windshield wiper of a car. Whenever you play a strumming pattern on the guitar, your strumming hand is like a wiper – it should keep moving no matter what. Think of it as your personal metronome.
If your strumming hand comes to a halt, your rhythm falters, and your chord transitions lose their groove.
"Always make your fretting hand keep up with your strumming hand. Never the other way round."
When playing guitar, your brain naturally wants both hands to move in sync. So, if your fretting hand struggles to form the next chord shape, it can cause your strumming hand to pause and wait until the chord is fully formed.
So here’s the trick: outsmart your brain! When you make your strumming hand persist (even if it initially sounds messy), your fretting hand will naturally pick up the pace.
How to use the Windscreen Wiper Method
Know you know The Windscreen Wiper method is a great way to learn to play the guitar quickly and efficiently; it’s time to put it into action.
Here’s a step-by-step guide on how to use the Windscreen Wiper method on your chords:
- Choose a strumming pattern. There are many simple common patterns to choose from, such as D/D/U/U/D/U. This is a basic strumming pattern that is easy to learn and can be used to play a variety of songs.
- Set the metronome. Start with a slow tempo, e.g. 85 bpm. This will give you time to focus on your timing and technique.
- Play the strumming pattern slowly. Make sure to keep your arm moving in time with the metronome.
- Practice in intervals of 60 seconds. This will help you to stay focused and avoid getting bored.
- Record yourself playing. This will help you to assess your progress and identify areas where you need to improve.
- Continue practicing until you can play the strumming pattern smoothly and accurately. Once you can do this, you can gradually increase the tempo of the metronome.
By following these steps, you can play your favourite songs in no time!
Step #10 The Importance of Dedication
If you want to get faster, better-sounding chord changes on guitar, you need to practice. And not just any old practice, but perfect practice. What do I mean by perfect practice?
Practicing with intention and focus.
When you practice, set mini to big goals for yourself. For example, you might start by trying to change between two chords smoothly. Then, you could challenge yourself to change between three chords. And so on.
Adding to that, when you practice, be patient and persistent. It takes time and effort to master chord changes. But if you keep at it, you’ll eventually get there.

Summing it Up
To summarise what we’ve learned in this post, here are the most crucial steps to getting faster, better-sounding chord changes on guitar:
- Practice. And not just any old practice, but perfect practice. That means practicing with intention and focus.
- Set mini to big goals every time you practice. For example, you might start by trying to change between two chords smoothly. Then, you could challenge yourself to change between three chords. And so on.
- Be patient and persistent. It takes time and effort to master chord changes. But if you keep at it, you’ll eventually get there.
Here are some additional tips for practicing chords effectively that leads to fast, smoother chord changes:
- Start with simple chords and gradually work your way up to more complex chords.
- Practice changing between chords slowly at first, and then gradually increase the tempo.
- Use a metronome to help you keep a steady beat.
- Practice with a recording of a song that uses the chords you’re practicing.
- Record yourself practicing and listen back to your recordings to identify areas where you need to improve.
If you follow these tips, you’ll be well on your way to faster, better-sounding chord changes in no time.
Keep doing what you love and spread musical joy.