Discover the first two most used guitar chords beginners should know (+ finger position charts & exercise tips).
Are you wondering what the two most used guitar chords are that you should learn as a beginner guitar player first? You’ve found the right place.
Let’s get right to it – The first 2 chords you need to learn as a beginner player are, beyond a shadow of a doubt, E major and E minor.
No Shortcuts!
We believe if it's worth learning, it's worth learning properly. There's no point in wasting your time with 'easy versions' or 'cheat' chords. Learn the correct way, learn once, sound epic.
Table of Contents
Why learn E major and E minor chords first?
E major and E minor chords are the first two chords you should learn on guitar because they are the easiest to play and the foundation for many other chords.
You can move these chord shapes up and down the fretboard to create barre chords, which open up a whole new world of musical possibilities.
Here are a few other reasons why you should learn E major and E minor chords first:
- They are the most common chords in popular music.
- They are easy to transition between, making them ideal for strumming and accompaniment.
- They can be used to play a variety of songs, from simple folk tunes to complex rock solos.
Before we get to the chord charts, let’s review some essential basics.
How to Read Guitar Chord Charts
The vertical lines in the chord diagram charts represent your guitar strings. The horizontal lines in the chord boxes show the metal frets.
The string notes are written under the strings, with the fret number shown on the left of the chart.
The numbers in the circles show what finger you should use to fret the string:
1 = 1st (index) finger
2 = 2nd (middle) finger
3 = 3rd (ring) finger
4 = 4th little (pinky) finger
x = don’t play the string
o = open string
Warning: Always make sure you use the same finger placements on your chords. A common beginner and self-taught guitar player mistake is randomly changing chord fingerings.
This makes building up muscle memory and achieving clean fast chord changes gruelling.
Pro Tip
When you see a chord written as just a capital letter like this - "E" it means it is a major chord. Any chord with a lowercase 'm' next to it like this - "Em" is a minor chord.
E Minor and E Major Chord Diagrams
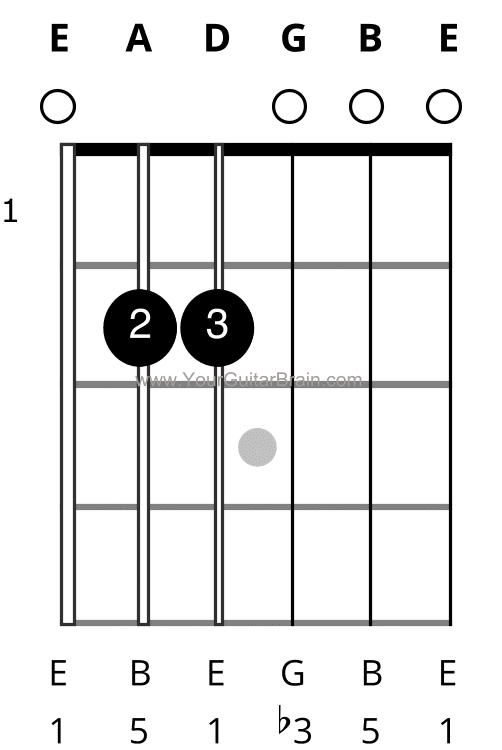
Chord 1 – E minor
Out of the seven chords, the best 2 guitar chords to learn first are E major and E minor.
If you’re just starting out with playing guitar, begin with the E minor chord as your first chord.
This particular chord has the easiest shape to play, making it an ideal choice for beginners. With its two fingers placed in a simple pattern, you’ll quickly be able to get the hang of playing it smoothly.
So, give it a try and start building your guitar skills from the ground up.
The E minor chord is made of the notes E, G and B. Below is the easiest way to play the open Em:
- Place your middle (2nd) finger on the second fret of the fifth (A) string.
- Place your ring (3rd) finger on the second fret of the fourth (D) string.
- Strum all six strings from the low E string to the high E string.
Here is the E minor chord diagram:
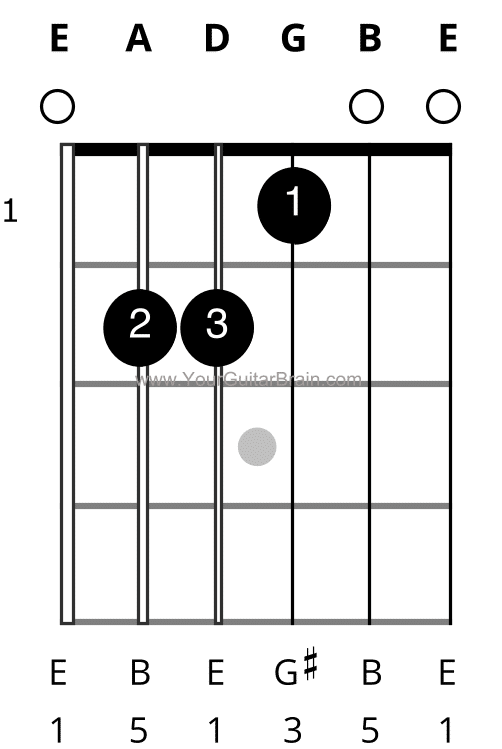
Chord 2 – E major
Learning the E major chord on guitar is essential for any beginner. This chord is made up of three notes: E, G#, and B.
To play the open E major chord on guitar, the standard fingering chart displayed below can be used. With practice, mastering this chord will enable you to play a wide variety of songs.
Here are the steps:
- Place your index (1st) finger on the first fret of the third (G) string.
- Place your ring (3rd) finger on the second fret of the fourth (D) string.
- Place your middle (2nd) finger on the second fret of the fifth (A) string.
- Strum all six strings from the low E string to the high E string.
Here is the E major chord diagram:
What are the next chords a beginner guitarist should learn?
Once you have mastered E major and E minor chords, you can easily learn other open chords, such as A major, D major, and G major. You can also start to learn barre chords, which allow you to play chords all over the fretboard.
Here are a few tips for learning E major and E minor chords:
- Start by learning the basic chord shape. Place your fingers on the strings according to the chord diagram.
- Strum the strings gently and evenly.
- Once you can strum the chord cleanly, try adding some rhythm.
- Once you are comfortable playing the chord on its own, try playing it in a simple strumming pattern.
- Practice changing between E major and E minor chords.
Once you have mastered E major and E minor chords, you will be well on your way to becoming a guitar pro!
How To Master Guitar Chords: 7 Tips From The Pros
Playing guitar chords is one of the most essential skills for any guitarist. Whether you want to play rock, pop, blues, or any other genre, you need to know how to form and strum chords.
But learning guitar chords can be frustrating and challenging, especially for beginners. You may struggle with buzzing, muting, or fingering the chords correctly.
Don’t worry; we’ve got you covered. The following seven tips will help you improve your chord technique, sound, and confidence.
Tip 1: Lightly wrap your thumb around the guitar neck
One of the most common mistakes beginners make when playing guitar chords is gripping the neck tightly with their thumb.
This can cause tension in your hand, wrist, and arm, affecting your chord sound and making it harder to switch between chords.
For better control and flexibility, lightly wrap your thumb around the guitar neck and position it behind, not on top. Keep a small gap between your palm and the neck to help mute unwanted strings.
Tip 2: Keep your thumb by fret 2
Another tip related to your thumb position is to keep it by fret 2 when playing open guitar chords. This will help you maintain a good posture and balance for your hand.
If you move your thumb too far up or down the neck, you may stretch or bend your fingers too much, which can cause pain and fatigue.
Keep your thumb on fret 2 for better chord accuracy and consistency. This technique allows easy access to all strings and frets, making it easier to transition between chords and play in different positions.
Tip 3: Press the string with the tips (pad) of your fingers
One of the keys to getting a clear and crisp sound from your guitar chords is to press the string with the tips (pad) of your fingers.
This will ensure that you have enough pressure on the string and that you don’t touch any other strings that may cause buzzing or muting.
Curve your fingers slightly when pressing the instrument’s string. Use the part closest to the fingernail and apply some pressure, but not too much. Don’t use the flat side of your finger to avoid affecting the sound and accuracy of the chord.
Tip 4: Curve your fingers
To play guitar chords correctly, curve your fingers. This allows you to use your finger tips and avoid touching other strings in the chord.
Bend your fingers at the knuckles and keep them close to the fretboard. Aim for a 90-degree angle and avoid flattening or curling too much to prevent tension and discomfort.
Tip 5: Press your fingers down with the correct pressure
Another factor that affects your chord sound is how much pressure you apply on the string with your fingers.
If you press too lightly, you may not get enough contact with the string and produce a weak or muted sound. If you press too hard, you may make the string go out of tune.
For optimal guitar sound, find the right pressure on the strings. Start with a light touch and gradually increase until you hear a clear sound. Maintain this pressure for different chords.
Tip 6: Don’t place your fingers on the metal frets
Another common mistake that beginners make when playing guitar chords is placing their fingers on the metal frets instead of behind them. This can cause several problems for your chord sound and technique.
Placing your fingers on metal frets can cause buzzing and make it harder to press strings, affecting accuracy and causing discomfort.
Placing your fingers on the metal frets can make it harder to switch between chords smoothly and quickly. This is because you must move your fingers more to reach the next position.
To avoid these problems, you should always place your fingers roughly in the middle of the fret box. This will give you the best sound and feel for your guitar chords.
Tip 7: Practice chords every day
Consistent daily practice is crucial to playing guitar chords correctly. It helps develop muscle memory, coordination, and confidence. With regular practice, playing chords becomes smoother and easier, and learning new ones is faster.
To practice guitar chords effectively, follow a routine that covers essential chords for your level and style. Try exercises like chord switching, progressions, and strumming patterns. Use a metronome or backing track to improve timing and rhythm.
Practice guitar chords daily with these 7 tips to play any song impressively and express yourself musically. Start now!
I AM Abundant, I AM Harmony, I AM Prosperity
Top 3 Beginner Chord FAQ’s
#1. What are open chords?
It’s essential as a newbie player, you start off by learning open chord shapes. Open chords are chord shapes that contain open (non-fretted) strings and they’re the important first chords you need to learn on guitar.
You can play thousands of songs using open chord shapes, and they can be changed into a multitude of other chord shapes further down the line. The first open chords guitar players learn are mostly played on the first three frets of the guitar.
#2. What’s the difference between major and minor chords?
Major and minor chords are the most often used guitar chords in all styles of music. The main difference between them is their sound – major chords sound happy, and minor chords sound sad.
This difference is caused by the interval between the root note and the third note of the chord. In major chords, this interval is a major third, which is four semitones (or half steps) apart. In minor chords, this interval is a minor third, which is three semitones apart.
For example, in a C major chord, the root note is C and the third note is E, which are four semitones apart. In a C minor chord, the root note is C and the third note is Eb, which are three semitones apart.
#3. How do I learn new guitar chords?
Learning new guitar chords can be fun and rewarding, as it expands your musical vocabulary and allows you to play more songs and styles. There are many ways to learn new guitar chords, such as:
- Use a chord chart or diagram showing you how to finger each chord on the fretboard.
- Use a chord book, such as Essential Guitar Chords for Beginners or a chord app, such as Chord Crush, that provides you with hundreds or thousands of chord variations for different keys and tunings.
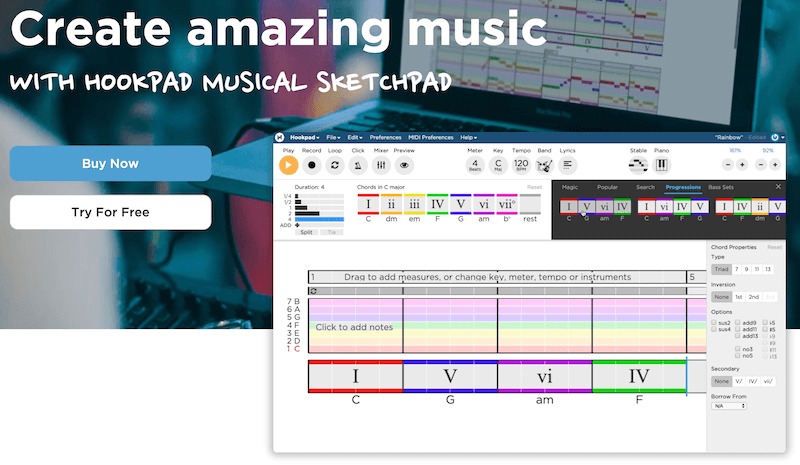
- Using ear training software such as EarMaster or Hookpad that’ll help you develop the skills to identify and play chords by ear from songs or recordings.

