How An Audio Interface Can Transform Your Sound Quality And Why You Need One

What is an audio interface and why do you need it?, What features should you look for in an audio interface?, How do you set up and use an audio interface? , beginner guide to audio interfaces, audio interface vs sound card

We are supported by our visitors. If you click through our links & make a purchase, we may earn an affiliate commission. Learn more

What is an audio interface, and why do you need it? What features should you look for in an audio interface? Find out all the answers in this ultimate beginner guide.

If you aim to record or produce music with good quality on a computer, it’s a fact that you require an audio interface.

However, people who are new to audio interfaces may have many questions.

Don’t worry, it doesn’t have to be an intimidating process.

In this blog post, we will provide a clear explanation of audio interfaces, their basic functions, and how they can enhance the sound quality of your music recordings.

Table of Contents

Do I Need an Audio Interface?

Here’s the scoop:

If you’re a musician, producer, VO artist, podcaster, or simply someone who aims for top-notch audio quality in your creations, then the answer is a resounding yes.

If you’re tired of the laggy, unreliable audio from your computer’s soundcard, an audio interface is your ticket to achieving that polished and professional sound you’ve been dreaming of.

Let’s break it down:

  • Musicians: Whether you’re into recording your guitar sessions at home or laying down tracks for your band, an audio interface is your ticket to professional-grade sound.
  • Voice-Over Artists: Crystal-clear audio is a must for voice-over work, and an audio interface delivers just that. Perfect for creating your voice reel.
  • Podcasters: Don’t settle for an amateur sound. An audio interface ensures your podcasts sound polished and pro.
  • Music Producers: Whether you’re mixing, mastering, or fine-tuning your tracks, an audio interface helps you achieve top-tier sound quality.
  • YouTubers: Mixing audio for your videos? Connect your condenser microphone via an XLR lead to your computer using an audio interface for a crisp, professional result.

What is an Audio Interface?

An audio interface is the secret weapon of successful musicians, podcasters, music producers and content creators.

It’s a device that connects your microphone, instrument, or other audio source to your computer, and it plays a vital role in the quality of your recordings.

Audio interfaces offer a number of advantages over built-in sound cards, including better sound quality, lower latency, and more inputs and outputs.

Whether you’re recording a single guitar track or a full band, an audio interface will give you the tools you need to create professional-sounding recordings.

Why Do I Need an Audio Interface?

There are three main reasons why you might need an audio interface even if your computer has a soundcard:

1. Better sound quality

Audio interfaces generally offer much better sound quality than built-in sound cards. This is because they have better audio converters and preamps.

Audio converters are responsible for converting analogue signals into digital signals, and preamps amplify the signal from your microphone or instrument before it reaches the audio converter.

Better audio converters and preamps will result in cleaner, more detailed recordings.

2. Lower latency

Latency is the delay between when you play a note or sing into your microphone and when it is heard in your headphones or speakers.

If you’re recording audio, having a low-latency interface is crucial rather than relying on your computer’s built-in sound card.

This way, you can monitor your recordings in real time without experiencing any delays. This is particularly important if you need to hear yourself accurately while recording.

3. More inputs and outputs

Audio interfaces are highly useful tools that enable you to connect multiple devices to your audio system.

Audio interfaces give you more input and output options than your computer on its own, so you can easily connect all sorts of audio equipment and get a better audio experience.

Compter sound cards can suffer from infuriating audio nasties such as sound delay, latency, clicks, pops and distortion.

Audio interfaces provide more benefits than built-in sound cards, including improved sound quality and lower latency.

Keep reading to learn more.

Benefits of Using an Audio Interface

In addition to better sound quality and lower latency, audio interfaces also offer a number of other advantages over built-in sound cards, such as:

  • More inputs and outputs: Audio interfaces typically have more inputs and outputs than built-in sound cards. This means that you can connect multiple microphones and instruments to your computer at the same time.
  • More features: Audio interfaces often have additional features that are useful for recording and producing music, such as MIDI I/O, built-in effects, and monitoring controls.

6 Features You Should Look for in an Audio Interface

When it comes to choosing an audio interface, it’s important to consider more than just the first recommendation you come across on a forum.

As the central hub for all your audio equipment, you need to take into account key features that will best suit your recording needs and budget.

Here are the top six factors to consider when making your decision.

Feature #1. How many inputs and outputs do you need?

The inputs and outputs you’ll need on your new interface depend on your planned recording and/or playback use.

Your user needs will fall into one of three categories:

1) Solo Use: If you’re planning on only recording your voice and guitar, for example, at any one time, it would be unwise to buy an interface with 24 input and output channels.

Instead, you’ll need only a few I/O’s so that you can connect your guitar, microphone and speakers to your computer.

Recommended I/O’s: 2-4 channels.

2) Local Bands & Production: Another scenario is if you have a medium to large studio set-up and plan on recording and monitoring a full band or if you’re part of a production team.

If you think you fit into this user category, you’ll need a mix of various Ins and outs.

Depending on the number of instruments and audio sources being recorded, it’s best to get an audio interface with more rather than fewer inputs and outputs.

This will help future-proof your studio set-up and keep your options open.

Recommended I/O’s: 6-12+ channels. 

3) Pro Producers and Engineers: Those working in professional recording studios and with pro artists use an audio interface for many different situations.

From recording 5+ piece bands in studios, capturing full orchestras, and tracking live bands on the road.

These guys have the means and budget to go for high-end, pricey audio interfaces.

Recommended I/O’s: 16+ channels. 

Another question to consider is also what type of I/O’s you require; here are three common types of input and outputs found on audio interfaces:

XLR 

XLR Connector for Audio Interface


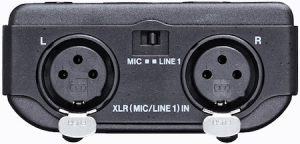
XLR connectors are the most common type of connector used for microphones. They provide a balanced signal, making them less susceptible to noise and interference.

XLR are typically balanced analogue inputs used for microphones. They are circular and have between 3-7 pins.

TRS / Jack

Line Jack Input and output for Audio Interface


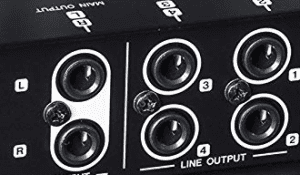
A jack connector is a general term for a type of electrical connector that is used to connect two devices together. Jack connectors can be used for a variety of signals, including audio, video, and power.

There are two main types of jack connectors: TS and TRS

MIDI

MIDI Input and output for Audio Interface


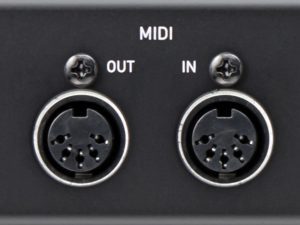
MIDI connectors are used to connect MIDI devices, such as keyboards, synthesizers, and drum machines. MIDI signals do not carry audio, but they can be used to control other devices, such as samplers and synthesizers.

Feature #2. Do you need phantom power?

Phantom power is a DC voltage measuring between 12-48 volts that is used to power a condenser microphone.

So, if you intend on using a condenser microphone for recording vocals and/or acoustic instruments such as guitar or percussion, you’ll 100% need an audio interface with phantom power input.

Feature #3. Is the audio interface Mac or PC compatible?

The good news is that most audio interfaces are compatible with Mac and Windows systems. However, there are a few interfaces that are only supported on Mac.

Feature #4. Is it compatible with your DAW and software?

A DAW, or Digital Audio Workstation, is software used for recording and producing music. Most audio interfaces are supported by popular DAWs like GarageBand and Cubase.

Prior to making a purchase, we strongly recommend verifying the compatibility of the audio interface with your existing setup.

Pro Tip

Some audio interfaces come with free versions of popular DAWs like Pro Tools and Ableton. This means that the software is guaranteed to work well with the hardware, and it gives you a chance to try out the DAW before you buy the full version.

Feature #5. Is the price, size and weight ideal for your needs?

Price: 

If you’re making music or recording other types of audio as a hobbyist in your home music room and don’t plan on recording more than a few audio sources at one time, you don’t want to spend a fortune on an audio interface.

If you plan to share your recordings with other people, it is important to consider a more serious approach. It’s recommended to invest in an interface that won’t need to be replaced in a few years due to skimping on features to save a few pennies today.

Size and Weight: 

There are two types of interfaces: desktop and rack-mounted. Desktop interfaces are smaller and more portable, making them ideal for use in bedrooms and small studios.

Rack-mounted interfaces are commonly used in professional recording and playback settings. These units are larger and heavier than desktop models and are mounted in an outboard rack.

They typically provide more input/output options, and routing choices, and produce superior sound quality.

Feature #6. How are you planning on connecting to your device?

Because of the abundance of different tech devices on the market today, an audio interface isn’t only plugged into a computer.

You can also use gadgets such as smartphones and tablets loaded with software apps to capture recordings.

These are the five most common connection types used for linking an audio interface to your device:

5 Audio Interface Connection Types: Explained

1. USB Connection

USB Cable for Audio Interface Connections

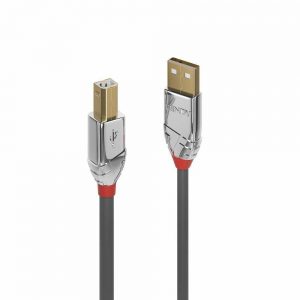
USB (Universal Serial Bus) is a standard that defines the cables, connectors and protocols used in a bus for connection, communication, and power supply between computers and electronic devices.

USB is the most common connection type for audio interfaces. It is a relatively inexpensive and easy-to-use connection that is compatible with most computers. However, USB can have higher latency than other connection types, such as Firewire and Thunderbolt.

2. Firewire 

Firewire Cable for Audio Interface Connections

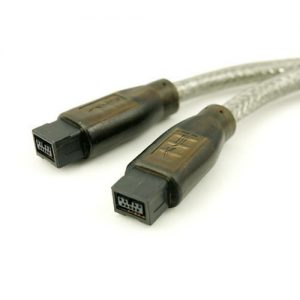
Firewire (also known as IEEE 1394) is a standard for a serial bus interface that provides high-speed communication between computers and other electronic devices. It has two versions, Firewire 400 and Firewire 800, which have different speeds and plugs. 

Firewire is less common than USB, but professional audio engineers often use it because it offers lower latency and higher bandwidth than USB.

3. USB-C

USB-C lead connection for audio interface

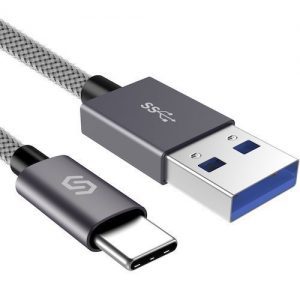
USB-C is a newer connection type that is becoming increasingly popular. It is a reversible connector that can be used for data transfer, power, and video.

USB C can support different types of data, such as USB 3.1, Thunderbolt 3, and DisplayPort, so you can use a USB-C cable to connect your audio interface to a computer with a Thunderbolt 3 port.

You can use adapters to connect USB C devices to older USB ports.

4. Thunderbolt

Thunderbolt Cable for Audio Interface Connections

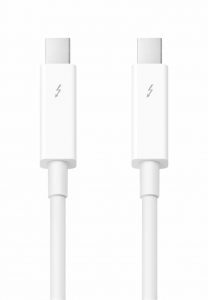
Thunderbolt is the fastest and most advanced way to connect audio interfaces to computers. Thunderbolt can send data, power, and video very fast and with low delay. 

Thunderbolt has three versions, Thunderbolt 1, Thunderbolt 2, and Thunderbolt 3, which have different speeds and features.

Thunderbolt can handle many more channels of audio than USB and Firewire. Thunderbolt is more expensive and less compatible than USB and Firewire, and it only works with some new computers. 

What Causes Latency and How Can You Reduce It?

Latency is the arch-nemesis of the musician and home music producer. It’s that annoying delay between when you play a note or sing into your microphone and when you hear it in your headphones or speakers.

The good news is that you can do a few things to reduce latency and improve your recording and monitoring experience.

Here are a few tips to help you reduce latency when you record and playback audio:

  • Use a faster connection. USB-C and Thunderbolt connections offer lower latency than USB 2.0. If you’re serious about reducing latency, it’s worth investing in a new audio interface with one of these connection types.
  • Reduce the number of inputs and outputs. The more inputs and outputs you have connected to your audio interface, the higher the latency will be. If you’re only using a few inputs and outputs, try disconnecting the rest.
  • Lower the resolution and sample rate. Recording at a lower resolution and sample rate will reduce latency, but it will also reduce the quality of your audio. If you’re not sure what resolution and sample rate to use, experiment with different settings to find a balance that works for you.
  • Decrease the buffer size and use an ASIO driver. The buffer size is the amount of time it takes for your computer to process audio before it’s sent to your audio interface. Using a smaller buffer size will reduce latency, but it will also increase the risk of dropouts. An ASIO driver is a type of audio driver
  • Upgrade your computer’s hardware. A more powerful computer will be able to process audio more quickly, which will reduce latency. Upgrading your computer’s CPU, RAM, and storage can significantly reduce latency, especially if you are using CPU-intensive plugins or recording and monitoring to a hard drive.
  • Minimize the use of CPU-intensive plugins. Some plugins, such as reverb and delay, can be very CPU-intensive. Using too many of these plugins can increase latency. To minimize CPU-intensive plugins, you can use built-in effects or offline effects and freeze and flatten tracks.

Good to Know

Theres no one-size-fits-all solution to latency. The best approach will vary depending on your setup and your needs. Be prepared to experiment.

What Are the Best Audio Interfaces for Low Latency?

The best audio interfaces for low latency are those that have a fast connection, a high-quality sound card, a low buffer size, an ASIO driver, and good compatibility with your DAW and operating system.

How Do You Set Up And Use An Audio Interface?

Here are the basic steps of how you set up an audio interface for beginners:

Hardware setup:

  1. Connect your audio interface to your computer using the appropriate cable.
  2. Connect your instruments, microphones, and speakers to your audio interface using the appropriate cables or adapters.
  3. Turn on your audio interface and computer.

Software setup:

  1. Open your DAW and go to the audio settings.
  2. Select your audio interface as the input and output device.
  3. Adjust the gain levels and monitor settings on your audio interface.

Recording:

  1. Create a new track in your DAW.
  2. Select the input that you want to record on.
  3. Press the record button in your DAW.
  4. Start playing your instrument or singing into your microphone.
  5. Press the stop button in your DAW when you are finished recording.

Playback:

  1. Select the track that you want to playback.
  2. Press the play button in your DAW.

Troubleshooting:

If you are having problems with your audio interface, here are a few things to check:

  • Make sure that your audio interface is properly connected to your computer and that the driver software is installed.
  • Make sure that your DAW settings are configured correctly.
  • Check the gain levels on your audio interface to make sure that they are not too loud or too quiet.
  • Try using different cables or adapters to connect your instruments, microphones, and speakers to your audio interface.

If you are still having problems, consult your audio interface’s manual or contact the manufacturer for support.

Tips:

  • Here are a few tips for using your audio interface:
  • Use high-quality cables and adapters to connect your audio interface to your computer and instruments.
  • Avoid using too many adapters, as this can degrade the quality of your signal.
  • Experiment with different gain levels to find the best setting for each input.
  • Use the monitor settings on your audio interface to adjust the volume and select which inputs and outputs you want to monitor.
  • Back up your audio recordings regularly.

Summing it Up

I hope this blog post has given you a good overview of audio interfaces and how to use them. Now it’s time to get out there and start recording some great music!

Here are a few tips to help you get started:

  • Experiment with different settings and features on your audio interface to find what sounds best to you.
  • Use high-quality cables and adapters to connect your audio interface to your computer and instruments.
  • Don’t be afraid to ask for help from other musicians or producers if you have any questions.

Most importantly, have fun and enjoy the process of creating music!

Check out our best audio interface review here: The 7 Best Audio Interfaces for Your Home Studio Needs.

Overcome challenges and amplify your musical skills

best guitarist female guitar lessons beginner intermediate how to play tips lessons free

Share